Git Remotes: How to Collaborate Without An Active Connection
Video
Motivation
git was made as a collaboration tool for people who couldn't share an active connection. In fact, its time travel capabilities came about as a result of trying to simulate simultaneous development between people who weren't connected.
In order to collaborate far and wide, git can connect any number of different directories, and you can specifically control when you synchronize to or from them. This allows for all manner of architectures. These directories are called remotes.
Though the most popular architecture is a centralized one, with a single server, several branches, and everyone connecting to it, a good understanding of remotes can help you contribute to projects large and small.
Remotes
To connect Git repositories, you set what is called a remote.
You can set remotes with:
git remote add {name} {URI}
For example, if I wanted to connect my GitPractice git directory on my local machine to a GitPractice.git git directory in my home folder on banach using the host shorthand we set up in week 1, I could run:
git remote add purdue ssh://math/~/GitPractice.git
To see what remotes you are connected to, run the command:
git remote -v
And to get rid of one, I could run:
git remote remove purdue
Setting up a git remote allows me to sync my changes between two computers.
Setting Up The Remote Server
We can use any git directory as a server, but - to prevent changes being made out from under you - git prevents us from putting files onto the active branch on the remote, so we would have to set up mutual remotes and actively pull them when we work.
To avoid this, we can go to the remote server, and create a bare Git folder - which will never have a working tree, let alone an active branch - with:
ssh math
mkdir GitPractice.git
cd GitPractice.git
git init --bare
This way we can set this path to the remote, and push as we like!
Back on our local machine, a quick:
git push purdue master
Will send the master branch to the server for safe keeping.
To simplify the push proccess, we can set a default remote to sync with:
git push --set-upstream purdue master
When we say git push or git pull, it defaults to pushing/pulling from branches declared upstream.
Cloning
Cloning is a quick way to:
- Create a new git directory
- Set a remote, upstream server
- Pull a current version of the main branch (typically
master) from that server
On the destination machine, if we want a instance of the git folder, we can use a file reference to clone it:
git clone GitPractice.git
Go into the new GitPractice directory and you'll see our files! Now we need to keep them in sync.
Pushing
Make a change, and a new commit, on your local machine.
Now that we have made some changes, and want to share them, we can run:
git push
To synchronize them with the upstream server.
Pulling
Now that the work is on the remote, we can pull it down to the target repository. Because the remote is an upstream, we just need to run:
git pull
Merging
Take a moment to configure your git on the Purdue server - with a username and email.
Let's make a change to example.txt on the server:
cd GitPractice
echo "\n A Change Made on Purdue's Server\n" >> example.txt
git add example.txt
git commit -m "Make an Example Change on a different Git"
git push
Now suppose that someone else pushed to the remote, but we had changes in progress locally.
Return to your local machine, and make a different change to example.txt in the same location, and commit it.
When you push now, you get an error: Updates were rejected because the remote contains work that you do not have locally. The suggested next thing to do - by the error and by practice - is to git pull the changes, merge them, create a new commit and push that.
This automatically created a collision branch. If we want to control when merges happen - for example, to keep one new feature separate from others - we can create and merge branches explicitly.
Branching Timelines
Quick Stashing
Say you have made some changes, and the code doesn't work. You need a working version now. However, you have done some progress - and you want to go back to this. What you want to do is stash this code somewhere for later use.
For that, you can use:
git stash
You can see what you stashed with:
git stash list
This can be unhelpful, so to see what we did in stash 0:
git stash show 0
And resume with:
git stash apply 0
To make it more helpful, let's leave a message when we stash:
git stash save "Practicing Stashing"
We can clear our stash with:
git stash clear
The stash is an easy-come, easy-go cubbyhole for code you are actively working on. As a general rule, never leave code in there long enough for you to come close to forgetting it - an hour is pushing it.
Proper Branching
So say we want to store our code somewhere other than our main line, but we want to keep track of it with our git tools - and not have it disappear next time we git stash clear.
Branches are splits in the timeline - you can think of them as the decision moment that creates parallel timelines - such as one in which you developed a new feature, and one in which you kept your code stable.
We can switch to another branch with:
git checkout -b branching_practice
If the branch name exists, it switches over to it - however you left it before. (you can even create divergent timelines in the past by passing it a commit hash.)
If not, it creates a new one at the point of the last commit.
If you want to create a new branch with work in progress, it's easy - just git stash the changes, and git apply them in the new branch!
You can switch back and forth between your branches with checkout whenever you are between commits (and when you're not, a quick stash is your friend.) The original branch is called master - after the "master record" in copymaking - so a quick git checkout master can take you right back.
We can see the branches - and which one we're on - with:
git branch -a
Merging Branches
Say you finish your feature - it's passing all tests - and you want it in your main branch.
Return to the target branch - in this case, master:
git checkout master
Now we can merge in some data.
git merge branching_practice
This (by default) creates an automatically-formatted commit, with a commit message "Merge branch 'branching_practice'".
If nobody has changed the overall file structure too much, or you have all worked on separate files, git is almost always going to figure out the correct merge for your files. If you edit the same line in multiple branches and then try a merge, this is likely.
In that case, it opens your editor - set in core.editor - to a file where you can resolve the conflicts.
Many modern editors - especially atom - have special behaviors to make resolving these conflicts reasonably easy. Atom will list the conflicts in the git pane, and allow you to select with a click or a keystroke which to choose.
When you have resolved the conflicts, then you can create a new merged commit!
Viewing Merges
It can be helpful to view graphs of the changes across branches.
This is possible with:
git log --oneline --graph --all
The --all flag allows us to see all the branches, which can help us see if it is safe to merge.
GitHub
GitHub is the dominant remote, and offers hosting as well as a variety of useful features not part of git - such as issue tracking, pull requests, project webpages, and interactive blame and log pages.
It also offers a variety of useless features, such as social networking, but we won't get into those.
SSH Keys
Way back in week 1, we created some ssh keys.
We can add those to GitHub - for passwordless push.
Open your .ssh directory. Your public key is the id_rsa.pub file. Open it up and copy the inside text.
You can set your keys in the Keys Settings Page. Click "New SSH Key" and paste in the data you copied from id_rsa.pub.
Give it a name that represents your computer, save it, and you're done!
Cloning Repositories
To get the url - for git clone or remote add - click the Download Code button on a project:

And copy the URI it provides:
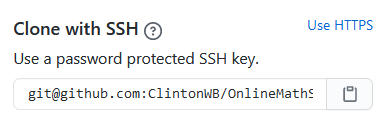
This string can now be used as a URI for git operations, such as git clone.
Homework
Today your homework is to continue to get ready for tomorrow's git project, with a couple steps:
-
Coordinate with your peers to select one person to host the project. The host will:
- Use GitHub's fork button to create a copy of the group project repository.

- Use GitHub's project settings to invite the other collaborators to the project.
- Help verify that all group members understand the steps necessary to create a fork and add collaborators.
-
Each User will:
- Join the project by going to the invitations page
https://github.com/{host username}/OnlineMathSolverExample/invitations - Add their
id_rsa.pubfile to their GitHub Account - Clone the repository to a local directory.
- Check their Git Remotes with
git remote -vto make sure you have push and fetch access to your project host's GitHub fork of the project
- Join the project by going to the invitations page
Once everyone has a local copy connected to the project, your homework is done!
Tomorrow, we will install requirements, divide up the Issues into individual tasks, create feature branches for them, and cover pull requests - the process by which you can get your code added to a larger project.